
Webex for Broadworks provides best in class Unified Communication capabilities fully integrated with your HVS service. The application can be run across different devices, to meet your needs, inside and outside the office.
The desktop version of the app will work across computers running Windows and Mac iOS. The mobile versions can be run on Apple and Android mobiles and tablets. The features available within the app will depend on your Webex licence.
The features included with the Softphone application are:
> Calling
> join as a meeting participant
The Basic Webex package is included free of charge with the HVS User Mobile licence.
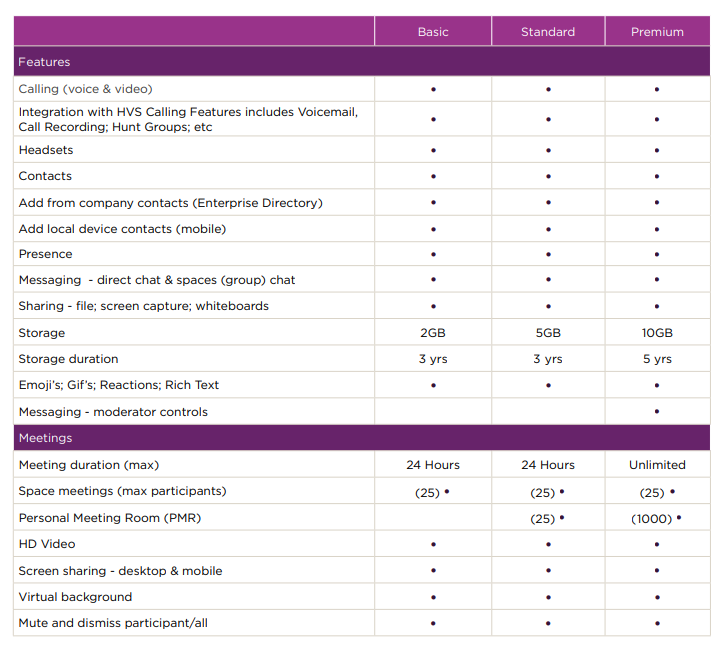
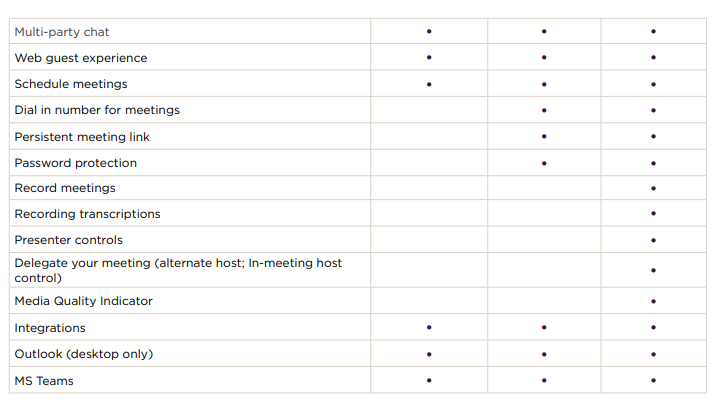
Summary of the app features available for the different licences
First time Welcome screen
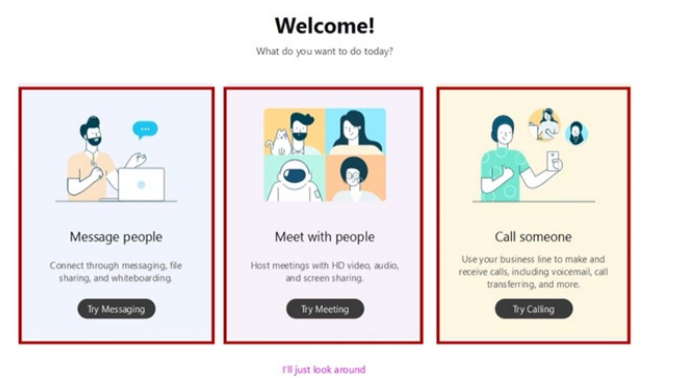
> Once you have logged in for the first time on Cisco Webex for Broadworks, the first time welcome screen above will be displayed. For extra guidance please click on the Try messaging, Try meeting and Try calling button.
Main Webex interface
> Here is the main home screen that will appear as you enter the app, ready for you to get started.

Main Webex features
Status and preferences
> By clicking on your icon in the top left hand corner – you will see a Menu with different options to manage the app. Most are self-explanatory, please see the main points.
> Click on Edit profile – and you will see your telephone number, and be able to edit your details. Even add a photo.
> Click Settings, and the setting menu appears. From here you can see and amend the settings for all of the features on the app.
> What’s new – shows the latest updates to the app.
> Sign Out will mean the next time you log in you will need email, username and password. So it might be best to click Exit if you wish to switch off the app as then this information is remembered.
Messaging
> You can also search for your contacts to message on the main search bar at the top of the Webex application. For internal contacts you can use name, phone number or email address to search. For external Webex users, you will need to search for their email address.

> You can also click on the Message icon , select a person, from People list or space from your Spaces list. Click on the Message area and type your message and press send. (Search for Contact)
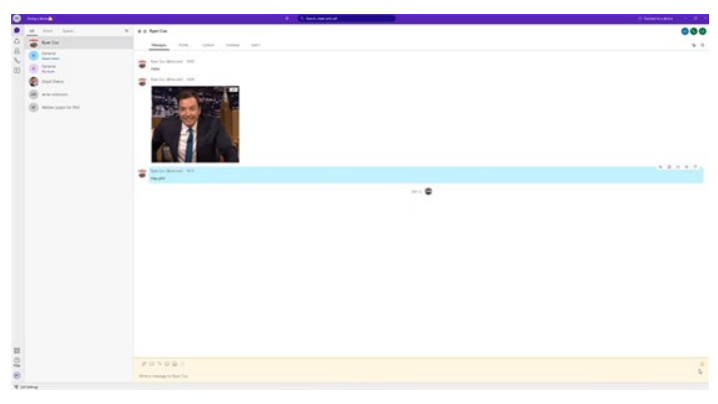
> The icons below indicate the messaging features available in the message window. From sending attachments, screen capturing, format text, adding emoji’s/symbols, Gifs and inviting to personal rooms.

> In your messaging chat below, you can also view the profile of your contact, under the content section send files, create whiteboards, share links/add website shortcuts and finally schedule a meeting.

Will I have access to my contacts in the Enterprise Directory on the Business Portal?
Yes – contacts within your company Enterprise Business Directory will be available within the App. At the moment your site, local or personal contacts are not currently available but will be coming in a future update.
Just search for your contact via name, telephone number or email address in the Search in the tollbar at the top of the screen.
You can then select the contact you want, you can then add them to the contacts in your Webex app.
Please note: that when you add contacts onto your Enterprise Directory in the business portal these need to synch with the Webex for Broadworks app before they can be searched for in the app. Currently the synch process takes 24 hours.
Teams
> You can create a team to organise spaces for a group of people to join. By selecting the Teams icon you can create a team by giving the team a name, describe the team, add contacts to join the team. Once you have entered the details, press create.
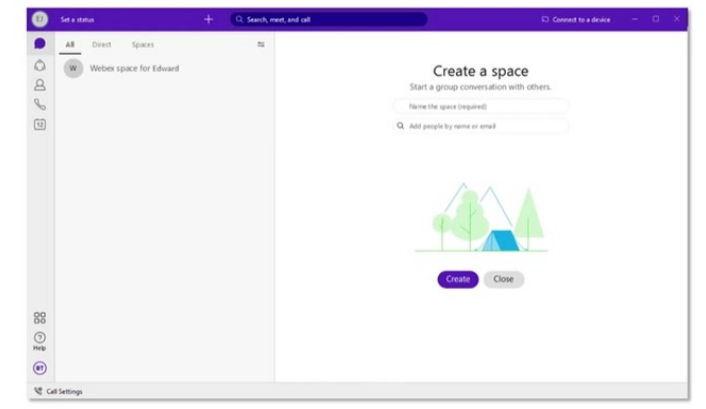
What is a Space and how do I create one?
In Webex, when you send a message to a group for the first time, you create a space for the group to talk. Spaces work best for a group of people collaborating on a specific topic or project. You can send messages, make calls, have audio & video meetings with up to 25 people, share files, and use whiteboards.
The next time you message the group, your conversation picks right up where you’ve left it.
For desktop:
1. In the app header, click  , and choose Create a Space.
2. Enter a name for your space. As you enter the name for your space, you may see a list of similar spaces that you’re already in. If one of those suits your needs, click the space name to go to that space.
3. Enter the email address or name for each person you want in the space. As you enter email addresses, this also filters the list of similar spaces with the space name.
4. Click Create.
For Apple (iOS):
Go to Spaces  , tap
, tap  , and select Create a Space.
For Android:
Go to Spaces  , tap
, tap  , and select Create a Space.
Contacts
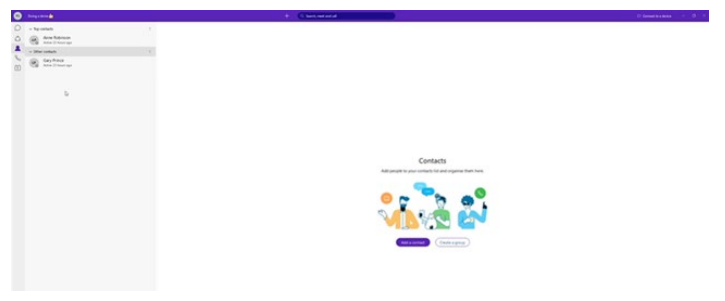
1. To add a contact select the contacts icon, where you can select the Add a contact button.
2. You can then select whether you would like to add contact as Other as per the screenshot above or create a Top contact.
3. Please add contacts name or email followed by pressing the Add button.
4. The contacts added then appear in your contacts tab as above, where you can message, call them or Video chat.
For Mobile devices , as part of the set up you can give Webex access to your existing contacts list on the device.
If you are searching for a Webex contact outside of your organisation – you must search for their email address.
Calling
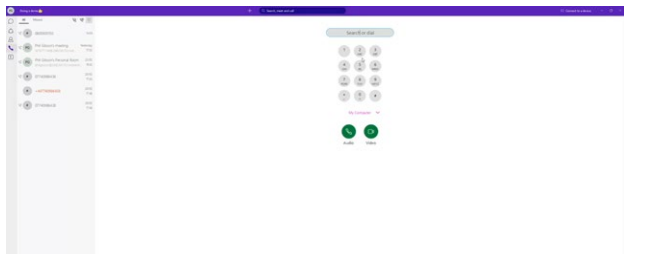
1. A quick way to make a call is to  calling icon,
2. Click the search field where you can either search for your contact in the search field or dial the number directly into the dialler.
3. After you have identified the contact or keyed in the number, Click the Audio Call or Video Call icon.
Please note: Direct video calls can only be made to other Webex users
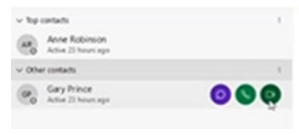
You can also make a call by selecting your Contacts  icon where you can hover over your contacts to make an Audio or Video call.
When you’re on a phone call you also have the ability to:
> put a call on hold
> transfer a call to someone else
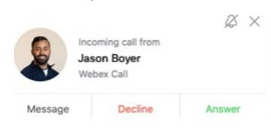
Answer a call?
When you receive a call, you’ll see a notification allowing you to:
> Answer: to take the call
> Decline: if you can’t answer now
> Message: if you want to answer with a chat message instead (only applicable to calls from another Webex user)
Please note:
> All calls are made over your HVS service to enable the use of all call features, such as Call Recording; Voicemail, Hunt groups etc.
> On Mobile devices without voicemail, when declining a call (without answering) it can take a few declines to stop the call ringing.
How do I set my status/presence?
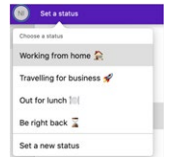
For desktop:
1. In the app header click Set a Status.
2. Select a status from the list or click set a new status to create a new one.
For Apple (iOS) & Android:
1. Tap on your profile picture and Set a Status.
2. Select a status from the list or click set a new status to create a new one.
Please note:
> For presence it can take a few minutes to refresh following calls
Meetings
There are 2 types of meetings available within Webex:
1. A Space meeting - this is a meeting that is set up within a specific Space
2. A Personal Room Meeting (PMR) – this is where the user has access to their own Personal Meeting Room. So can have instant or scheduled meetings within the PMR
Key differences:
Space Meeting – It is a meeting for up to maximum of 25 participants within that Space.
Personal Meeting Room (PMR) – is available for Collaborate licence and Premium add on users only,
up to a 25 participants for Collaborate or up to a huge 1000 users with the Premium Meetings add on.
This includes an audio dial in and guest browser link capability. The PMR details can be sent to other participants for them to access the meeting (PMR) for example in an outlook calendar invite.
For a Space meeting:
From within the space simply click on Meet 
The meeting will start immediately and everyone within that space will see a Join button in their meeting list and Spaces list to join the meeting.
On Desktop and Mac you can schedule a Space meeting using Microsoft Outlook.
Details on how to do this can be found here
For Personal Meeting Room meetings on desktop:
Start with Desktop experience - to start a meeting
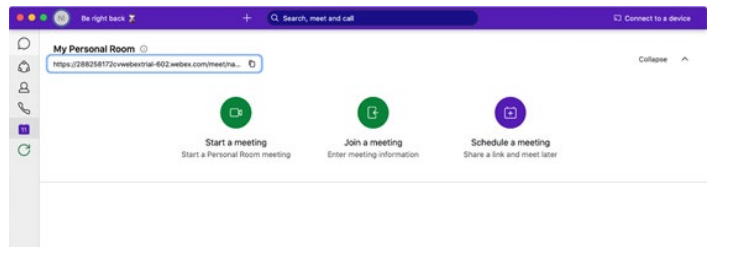
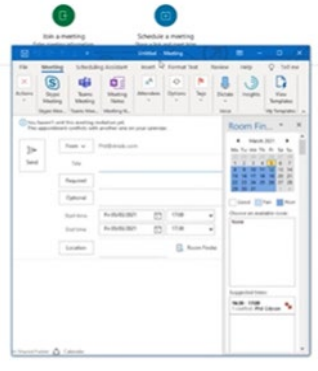
You can start a Personal Room Meeting by selecting the meetings icon, as displayed, (if you have the appropriate license). The Start a Personal Room meeting option will appear as above, along with your Personal Room URL Link above which can be copied and shared through email message and instant message etc. By clicking Schedule a meeting your MS Outlook will open a calendar invite as below.
Meeting scheduling options:
How you select your default meeting scheduler in the app can be found information
can be found here.
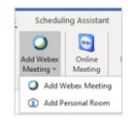
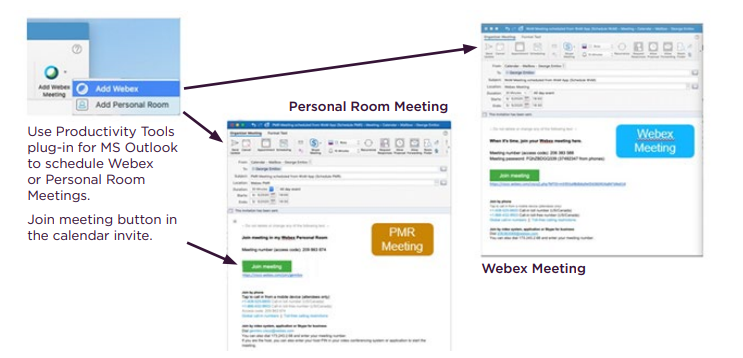
Productivity Tools (PT) for MS Outlook - enables you to start and join Webex
meetings directly in Microsoft Outlook.
> Downloadable Plugin for Outlook (Mac and Win).
> Login with your Webex email address, but it doesn’t need to match your
Outlook Email.
Scheduling Meeting from MS Outlook
In a Meeting:
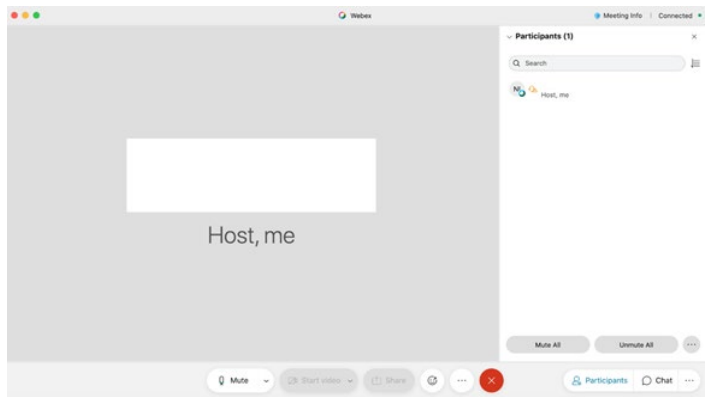
Once you have started your Personal Room Meeting the above screen will appear. Under the more options button you can also invite people to your personal room after a meeting has started, copy the meeting link, Lock the meeting and enable Breakout sessions etc. There is also a Chat function at the bottom right
of the window if you would like to message other meeting participants.
For Personal Meeting Room Meetings on Mobile:
When you first click to on the Meeting icon you will be asked to install the Webex Meeting application – this will enable the meeting to run within the Webex app. You will need your email address, application username and password to set this up.
Once set up it will ask for to your calendar. Which when allowed will enable the calendar functionality within the Webex App. The Webex app itself does not provide a calendar capability, it simply links to your existing calendar. So if you don’t link a calendar you cannot see or schedule meetings on the mobile app.
To start a meeting or get your PMT details to schedule a meeting simply clicking on the Meeting icon.
From here you will be able to start Meetings and Join other people’s meetings.
Please note: For PMR on a mobile it will drive the download of a second app Webex meetings. This app is required in order to be able to join meetings and schedule meetings on a mobile/tablet device.
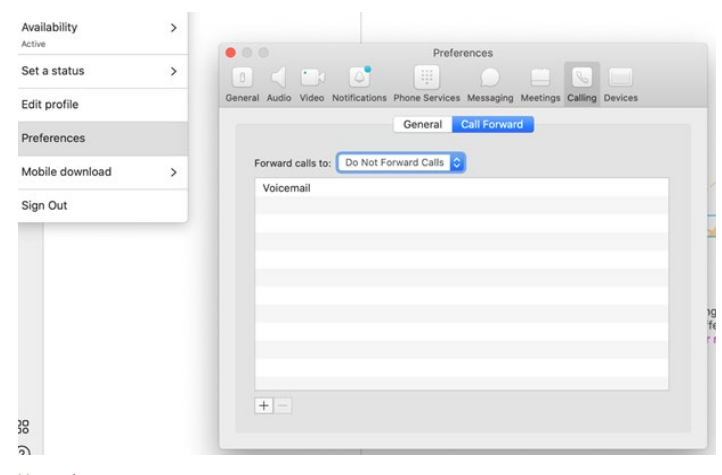
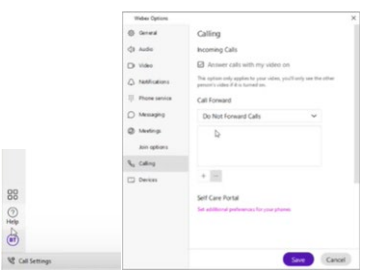
Call settings
Call settings is located at the bottom left hand side of the Webex application, where you can manage and change your settings. Here you can set your preference for how you receive calls. The default is set to answering calls with video on. Just click to change. You can also change your call forwarding and
voicemail settings. There is a further link to the Self Care portal where you can set all calling settings.
Using Webex Call with Microsoft Teams
If you are a Microsoft Teams user, the great news is that you can add Webex to
Microsoft Teams and then you will be able to make and receive audio and video
calls using your HVS with Webex service.
In order to do this your Microsoft Teams Administrator will need to have allowed
Cisco Call within MS Teams:– you can check this by clicking on the Apps icon or
the search dots and search for Webex Call. If it doesn’t appear the Administrator
needs to add it. Further Help including a great video can be found here.
If Webex Call is available then you can add this to MS Teams
But you must be a Webex user to use the Webex Call App.
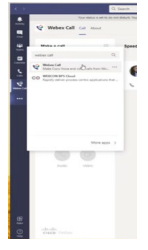
> In the Microsoft Teams interface look for the following icon to find Apps. You can then search by typing in Webex Call in the search field and the above will appear.
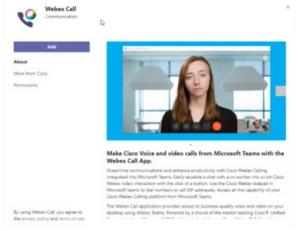
> The following Webex Call Pop up will appear, please read through the details outlined in the text.
When ready click the Add button.
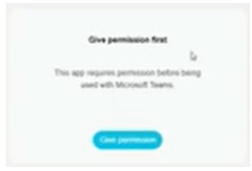
> A permission pop up will appear where you will need to select Give permission.
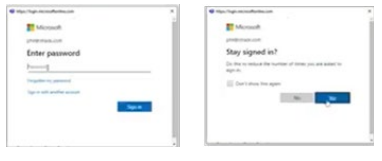
> You are then required to Enter your Microsoft Teams/365 password credentials
to connect Microsoft teams with Webex Call. Once entered please click Sign in,
followed by clicking Yes in the Stay signed in pop up box.
> You should now be connected and the Webex Call App will be installed on
your Microsoft teams. The Webex Call will also appear on the application bar
once this is pinned.
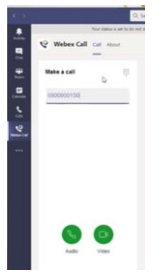
> You should then be able to make calls using the Dial pad above or a speed dial of your contacts. Once entered select the Audio/Video button.
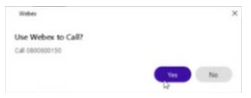
> The following pop up will appear to use the Webex application to call, please select yes to proceed.
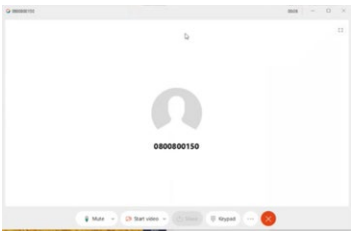
> The Webex window will then appear to start your call.
Important information - Logging in and out
When using the Webex Desktop App clicking ‘Exit Webex’ will mean your log in details are remembered for when you re-start the app.
If you use the ‘Sign Out’ function – it will completely sign you out and you will have to log in with your email address, application username and password.
On your mobile device - closing the app window (e.g. swipe right/up) when you click on the app icon again you will not need to log back in. However as above if you click Sign Out in the app, full log in details will be required.
Please ensure you keep a record of your Application Username and Password, as there will be instances where this will be required.
Application password can be reset on your Business Portal.
Business Portal passwords for users, can be reset by your company administrator on the portal.
Further Help
Additional help using the Webex Application you can also visit Cisco Webex Help Centre.
Be Aware this is a generic help site for Webex and is not specific to DWS or HVS or managed by Boxx. So there may be some information that is not applicable.
Known Issues
Unique email required for verification
A user will need to unregister from the existing Cisco product and re-register with Webex teams. This is caused by user already having the email logged with another CISCO product.
Conference call – can only have 3 way calling so cannot add 4th party
Conference calling will only allow 3 parties in the conference call, the 4th party automatically gets placed on hold when calls are merged.
END