How to Configure PhoneLine+ CICSO ATA Step by Step...
Configure your Cisco ATA 192 for PhoneLine+
Factory Reset
If you need to reconfigure your Cisco ATA for any reason (for example if you cannot get it to register on PhoneLine+), then the first port of call will be to factory reset the device. In order to perform a factory reset you will have two options.
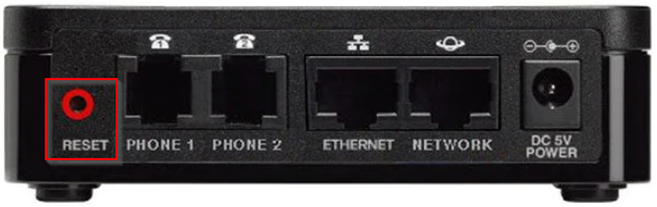
- The first way of doing this will be by pressing the reset button on the back of your device (as shown in the screenshot below), to do this get a paper clip or a similar object and press/hold the reset button for around 10 seconds.
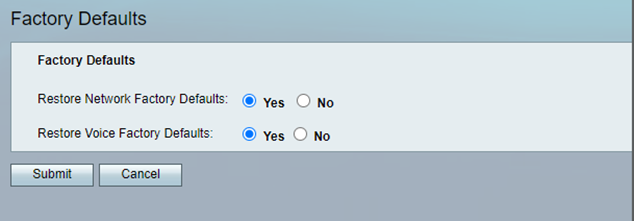
- The second option you have to complete a factory reset is to log into the device (for detailed instructions on how to do this, please see the reconfiguration section of this document). Once you are logged into the Cisco Web interafce, navigate to the Administration tab of the portal. From here you will see the option "factory defaults" on the left hand side. Once in this tab you will be presented with the screen below, select yes to resoring factory defaults for both network and voice settings and click confirm. Once you have performed this action the ATA will automatically reboot (this can take a minute or two).
Reconfigure your Cisco ATA
The next step once you have factory reset your device will be to apply the correct configuration rules so that your device can communicate/authenticate with the PhoneLine+ platform appropriately. We have created a step-by-step guide below which will guide you through how to access the device as well as how to change the appropriate profile rules on the device.
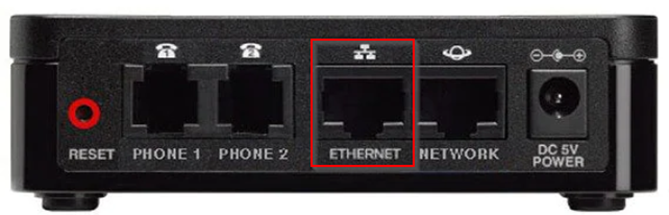
- Use a laptop/PC to connect to the ATA via an Ethernet cable. In order to do power up your ATA then take an ethernet cable, connecting one end into the "Ethernet" port on the device and the other end into your laptop/PC.
2. Once you have completed step 1, load up the command prompt on your computer (you can do this by going typing in CMD into your search function or by going to start and run then entering "cmd". Once the command prompt has loaded, type in "ipconfig" and hit enter. This will show all IP information including the gateway for all adapters. Once you have done this you will want to take a note of the default Gateway as shown in the example screenshot below:

3. At this point you want to load up your web browser and enter the default gateway into your address bar. From here you should be presented with a Cisco branded login page.
4. Use the following details to log into your ATA
-
- Username: admin
- Password: admin
5. Once you are logged into the Cisco GUI, you will want to navigate to the voice tab and then the provisioning sub menu (as shown in the screenshot below). Once you are in this page, you need to amend two of the provisioning URLs on the device:
-
- The first 2 URLs you will need to amend is labelled as the "Profile Rule" and “Profile Rule C” in this field you want to enter in the following
- PROFILERULE;https://provisioning-ss-gb-aws.gammaapi.net/plplus/cisco/ata192/$MA/settings.cfg
- PROFILERULE C: https://provisioning-ss-gb-aws.gammaapi.net/plplus/cisco/ata-generic/$MA/settings.cfg
- d.
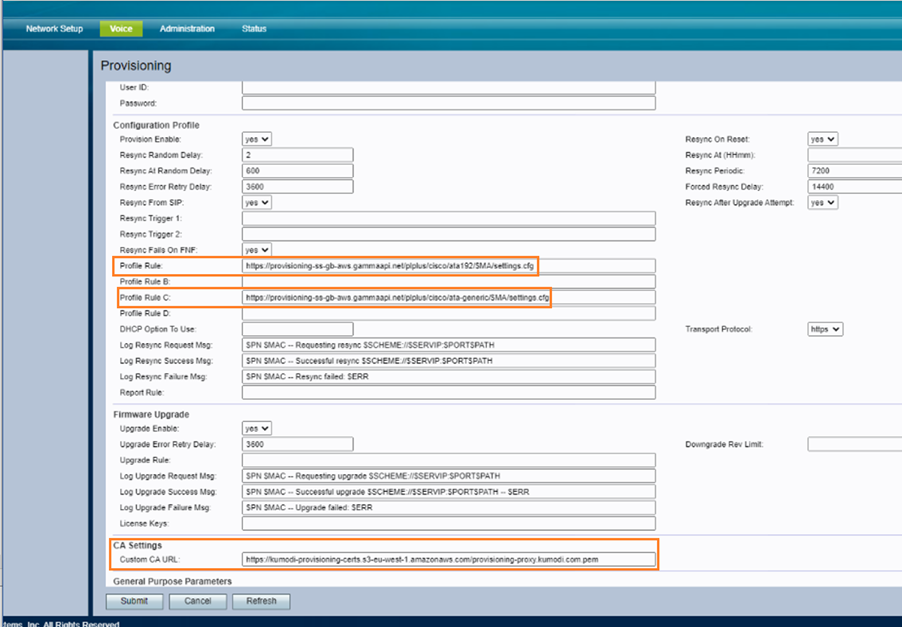
e. The second rule you need to change is listed as the "Custom CA URL", in this tab you will want to enter in the following URL: https://kumodi-provisioning-certs.s3-eu-west-1.amazonaws.com:443/provisioning-proxy.kumodi.com.pem
If you are familiar with the router your customer is using, you can look to remotely access your customers router and make changes by using the following steps:
- Setup a port forward to the IP the phone has been allocated.
- Add your IP to the access list that you will be remoting in from.
- When remoting in you will use https://wanip:portnumber in this example X will be the wan IP and port number at the end https://XXX.XXX.XXX.XXX:443
- Once you are finished you must ensure you remove your IP and port forward for security purposes.
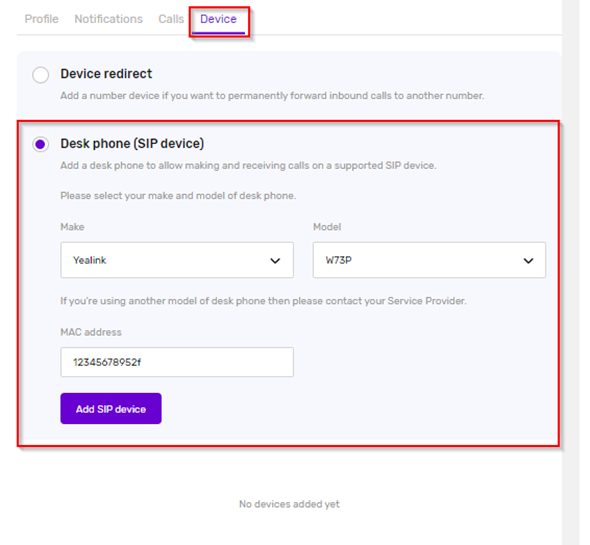
Re-provisioning your device to PhoneLine+ (If Required)
Once you have re-configured your Yealink following the instructions above, if you haven’t removed the device from your end user you will be able to just power up the device and wait for the configuration to download (this usually takes a couple of minutes) and the phone will work as expected.
However, if you have removed the device then you will need to re-validate the device against your customer. In order to do this log onto the PhoneLine+ reseller portal (portal.phonelineplus.com) find your customer, then then the user and navigate to the devices tab. From here you will be able to select the make and model of your device as well as adding in the MAC address (you can find the MAC address on the back of your device). Once you have entered in this information click “Add SIP Device” and then you will need to reboot your hardware in order for it to provision.