
Introduction
Polycom VVX450 Guide
This user guide will help you to navigate and use your VVX450 phone. It will give you an overview of your phone, and walk you through tasks so you can successfully use your phone to perform basic and advanced phone functions.
How to set up the Polycom VVX450
The phone will arrive pre-configured and needs to be connected to the internet & powered up using Power over Ethernet (PoE) or via AC power supply.
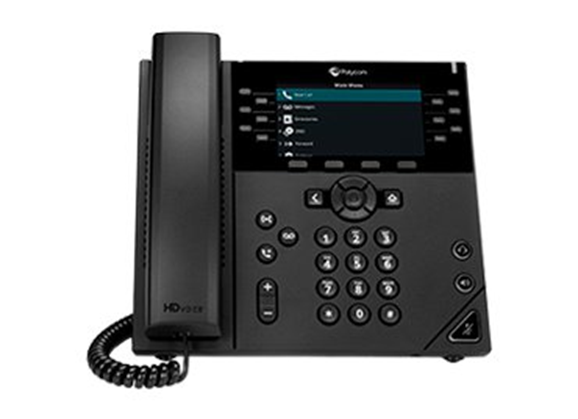
Phone Keys and Hardware
The figure below shows the main phone keys and features.

VVX 450 Hardware Features and descriptions
|
Reference Number |
Feature |
Feature Description |
|
1 |
Line keys |
Enable you to select a phone line, view calls on a line, or quickly call a favorite contact. |
|
2 |
Reversible tab |
Secures the handset in the cradle when your phone stand is positioned at a high angle. To secure the handset, remove the tab, reverse it so the protrusion points up, and re-insert it. Position the handset so the protrusion on the tab fits into the slot on the handset. |
|
3 |
Speaker |
Provides ringer and speakerphone audio output. |
|
4 |
Back key |
Enables you to return to the previous screen. |
|
5 |
Transfer key |
Transfers an active call to a contact. |
|
6 |
Messages key |
Enables you to access and manage instant and voice messages. |
|
7 |
Hold key |
Holds an active call or resumes a held call. |
|
8 |
Volume keys |
Adjust the volume of the handset, headset, speaker, and ringer. |
|
9 |
Dial pad |
Enables you to enter numbers, letters, and special characters. You can also use the dial pad keys to select menu items that have index numbers. |
|
10 |
Mute key |
Mutes local audio during calls and conferences. |
|
11 |
Speakerphone key |
Enables you to place and receive calls using the speakerphone. |
|
12 |
Headset key |
Enables you to place and receive calls through a headset. |
|
13 |
USB Port |
Enables you to attach a USB flash drive or USB headset. |
|
14 |
Home key |
Displays the Home screen from other screens and displays the Lines and Calls screen from the Home screen. |
|
15 |
Navigation keys / Select key |
Scrolls through information or options displayed on the phone's screen. Selects a field of displayed data. |
|
16 |
Soft keys |
Enable you to select context sensitive keys that display along the bottom of the screen. |
|
17 |
Security slot (on back) |
Enables you to attach a universal security cable lock to your phone so you can secure it to a desktop. |
|
18 |
Screen |
Shows a 10.9 cm (4.3 in) color display with a backlight that enables you to view menu options and data. |
|
19 |
Message Waiting Indicator |
Flashes red to indicate when you have new messages. |
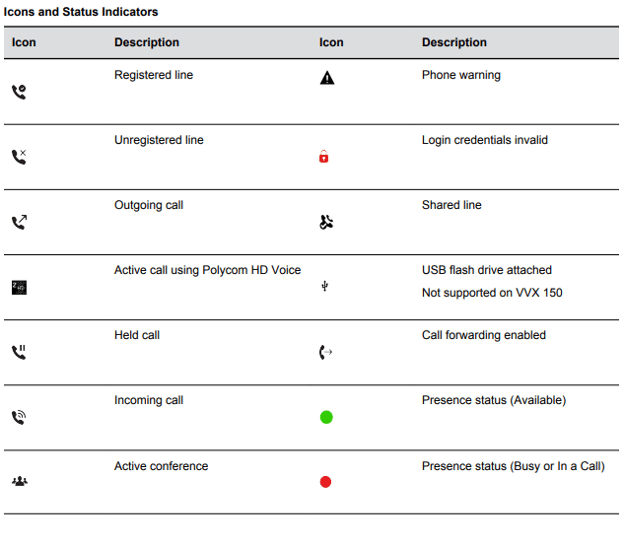
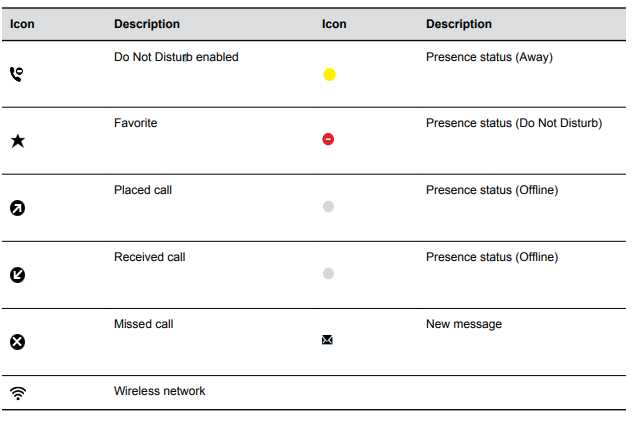
Phone Icons and Status Indicators
Calls Actions
Place calls
- The VVX 450 phone can manage a maximum of three active, incoming, and held audio calls at a time. However, you can have only one active call in progress with numerous other incoming calls or calls on hold on all phones.
Procedure
- Do one of the following:
- Start typing a phone number.
- Select New Call.
- Press a line key.
- Pick up the handset, press
 , or press
  .
.
- Enter a number or select a recent contact.
- Select Dial.
Answer an incoming call
Procedure
- Do one of the following:
Pick up the handset.
Press  or select Answer.
Press  .
.
After you answer the incoming call, the call becomes active.
Hold a Call
- You can place any active call on hold on VVX 450 Phone
Procedure
During an active call, select Hold 
If you're in the Calls screen, select the call first.
- A hold icon
 is displayed on the line of the held call and and a red LED light flashes on the line key
Resume a Call
- You can view and resume all held calls on the phone.
Do one of the following -
- Select Resume.
- From the Calls screen, select the call and select Resume.
Ending Calls
You can end active calls at any time, however, you must resume held calls before you can end the call.
You can end an active call on your phone at any time.
- Do one of the following
- Place the handset on the cradle.
- Press End Call.
- In the Calls screen, highlight the call and press End Call
Transferring Calls
You can transfer active or held calls to another person using the following transfer types:
- Blind transfer—Transfers the call directly to another line without speaking with the other party first.
- Consultative transfer—Enables you to speak with the other party before completing the transfer.
Choose a Default Transfer Type
You can choose a default transfer type to use for all calls on VVX 450 phone
When you choose a default transfer type, the phone uses the selected transfer type for all calls.
Consultative is the default transfer type.
Procedure
- Navigate to Settings > Basic > Preferences.
- Select Default Transfer Type and choose a transfer type.
The selected transfer type is used for all calls.
Transfer a Call
You can transfer a call to another contact and choose the transfer type you want to use for the call.
Procedure
- During a call, do one of the following
- Press Transfer
 to use the default transfer type.
 - Press and hold Transfer to use the non-default transfer type.
For example, if Blind is the default, press and hold Transfer to perform a Consultative
transfer.
- Press Transfer > More and select Blind or Consultative.
Depending on the default transfer type, either the Blind or Consultative option displays. For
example, if the default transfer type is Blind, then you can select Consultative.
- Dial a number or choose a contact from the Recent Calls or a directory.
If the transfer type is set to Blind, the call is transferred immediately.
3. If the transfer type is set to Consultative, select Transfer after speaking with your contact.
Cancel a Transfer
If a contact does not answer the transfer or you want to remain speaking with the contact on your line, you can cancel the transfer before it is complete.
Procedure
- Select Cancel.
The call is not transferred and becomes active.
Managing Calls
Display Calls from the Lines Screen
You can display the calls for each line from the Lines screen. When you select a phone line that has a held call, the first held call on that line is automatically resumed, even if you already have an active call on a different line.
Procedure
- Press and hold the line key

Display Calls from the Calls Screen
You can view multiple calls on your line from the Calls screen.
Procedure
- Do one of the following:
- Press the Home key

- From the Lines screen, press the Calls soft key.
The Calls screen is displayed with the list of active and held calls for each line on the phone.
Manage a Call from the Calls Screen
From the Calls screen, you can manage a call by holding, resuming, or transferring the call.
Procedure
- Select a call.
- Do one of the following:
- Select Hold
 to place an active call on hold.
 - Select Resume to make a held call active.
- Select End Call to end a call with a contact. You can end active calls only, so resume the
held call first before ending it.
- Select Transfer
 to send the call to another contact.
 - Select Conference to initiate a conference call.
Reject Incoming Calls
You can reject a call and send the call directly to voicemail. Rejected calls display in the Missed Calls list in your Recent Calls list. Rejecting calls is not available for shared lines.
Procedure
- From the Incoming Call screen, select Reject.
Reject Calls from a Contact
You can send incoming calls from a particular contact directly to your voicemail.
Procedure
- Navigate to Directories > Contact Directory.
- From your Contact Directory, select a contact.
- From the Contact Information screen, select Edit or tap.
- From the Edit Contact screen, select Auto Reject > Enabled and select Save.
Calls from the contact are sent directly to voicemail when the contact calls
Rejecting Calls with Do Not Disturb
Do Not Disturb (DND) enables you to set your phone to automatically reject calls when you don’t want to be interrupted.
Enable Do Not Disturb
You can enable DND to prevent your phone from ringing and to send all incoming calls directly to voicemail. All calls you receive while DND is enabled are logged in the Recent Calls list.
Enabling DND on shared lines disables ringing only. A visual notification of the call still displays, and you have the option to answer or ignore the call.
Note: When you set your presence status to Do Not Disturb and enable DND on your phone, a message stating that your status is set to Do Not Disturb scrolls under the time display, and the DND icon does not display in the status bar.
Procedure
- Select DND
Call Forwarding
You can forward an incoming call to a contact or forward all incoming calls to a contact.
To forward an incoming call:
- In the Incoming Call screen, select Forward.
- From the Call Forwarding screen, enter the forwarding number, and select Forward.
To forward all incoming calls:
- Select Forward or navigate to Settings > Features > Forward.
- If your phone has multiple lines, select a line.
- On the Forwarding Type Select screen, select a forwarding type.
- Enter a contact's number if enabled, and select Enable.
If you selected the No Answer option, enter the number of rings before the call is forwarded.
To disable call forwarding:
- Select Forward.
- If your phone has multiple lines, select a line.
- From the Forwarding Type Select screen, select your forwarding type, and select Disable.
Audio Conference Calls
The VVX450 phone can manage a maximum of three active or held conference calls at a time.. However, you can have only one active conference call in progress with numerous other conference calls on hold.
Initiate a Conference Call
You can initiate a conference call with up to two contacts.
Note: When your phone is set up for single key press conferences, you do not need to select the Conference soft key a second time to join parties to a conference call.
Procedure
- Call a contact.
- When the contact answers, select the Conference soft key.
The call is held.
- Enter another contact's number or select a contact from the directory or the call lists.
- When the contact answers, select the Conference soft key.
All call participants are added to a conference call.
Join Calls to Create a Conference Call
You can join one active call and one held call into a conference call.
Procedure
- Do one of the following
- When you have an active call and a held call, select the Join soft key.
- When you have an active call and more than one held call, select a held call and then select
the Join soft key.
The active call and the selected held call are joined into a conference. If you have multiple held
calls, the other held calls on the line remain held.
End a Conference Call
When you end a conference call, your connection to the call and all other participants will end
Procedure
- During a conference call, select End Call.
Hold a Conference Call
When you place a conference call on hold, you place all conference participants on hold.
Procedure
- Select Hold

Resume a Conference Call
Resuming a held conference call enables all participants to hear the audio of everyone on the call.
Procedure
- Select Resume.
Mute and Unmute Audio
You can mute the microphone so other parties cannot hear you. Microphone Mute applies to the handset, headset, and speakerphone. You can still hear all other parties when you mute your microphone.
Procedure
- During a call, including a conference call, press the mute key

- The other parties cannot hear you.
- Press again to unmute the microphone.
Phone Actions
View the Contact Directory
You can view and add contacts to the Contact Directory. To view the Contact Directory:
- From the Home screen, Directories > Contact Directory.
Listen to Voicemail
Procedure
- Navigate to Messages.
- Select Message Center.
- If you have multiple lines on your phone, select the line that has the new message.
- From the Messages screen, select Connect and follow the prompts to access your messages.