
Introduction This user guide will help you to navigate and use your Yealink W52P. It will give you an overview of your handset, and walk you through tasks so you can successfully use your phone to perform basic and advanced functions.

How to set up the Yealink W52P
The phone will arrive pre-configured and simply needs to be connected to the internet and powered
up. Your Administrator or installer should know how to do this for you. There are some
network/router level settings that must be applied, or the Horizon service will not work. For further details on these please refer to the Horizon user guide.
Up to 5 handsets can be registered to a Yealink W52P base station.
Usually the handset that comes in the same box with the base station is pre-associated with it. In case that the handset is not already associated with the base station, or if you would like to associate more handsets that have
been purchased separately you can find the required steps below
Register Handset
Press the  button on the base station for few seconds. Once the registration LED flashes slowly, this means that the base station is in the registration mode.
Press “OK” on the handset to enter the main menu
Select Settings > Registration > Register Handset
Once you see the available base station, select it and press “OK” Enter the registration PIN which
is 0000 and press “Done”
Note 1: Once the handset is registered it will automatically get a name such as H1.
Note 2: In order to check that the registration was successful and the device is ready to make/receive calls go to Main Menu > Status > Line Status
De-register Handset
In order to de-register a handset from the base station, follow the steps below:
Press “OK” to enter the main menu
Go to Settings Registration De-reg. Handset
Enter the PIN which is 0000 and press “Done”
Select the handset that you want to de-register, press “OK” and then “Yes”
Note: You can de-register any handset that is associated with the base station
De-register Handset
In order to de-register a handset from the base station, follow the steps below:
Press “OK” to enter the main menu
Go to Settings> Registration> De-reg. Handset
Enter the PIN which is 0000 and press “Done”
Select the handset that you want to de-register, press “OK” and then “Yes”
Note: You can de-register any handset that is associated with the base station
Upgrade handset firmware
When the handset registers to the base station, it will check if there is any new handset firmware.
If the handset is placed on the charger cradle and a new firmware is available then the handset will automatically update. In case that the handset is not placed in the charger cradle then a message will be displayed on the screen to inform you that there is a new firmware available. In order for the handset to start the upgrading process you have to confirm by pressing the “Upgrade” soft key.
Note: To double check that your handset is using the latest firmware, go to the Main Menu
Settings >Upgrade Firmware Upgrade
On the Firmware releases section you can find the base station FW and the handset FW which corresponds to each base station FW.
Please note, the batteries in the handset are not covered under manufactures warranty. These are standard AAA batteries. In the unlikely event you encounter any issues with the handset holding charge, we recommend you try alternate batteries.
Main Menu Structure
The handset menu has a number of levels. The main menu is the top-level menu, which consists of six menu items: Status, Intercom, Voice Mail, Call Features, Directory and Settings.
The next diagram is showing the structure of the main menu and the options that are available to
the end users. For security reasons some options have been locked (L).
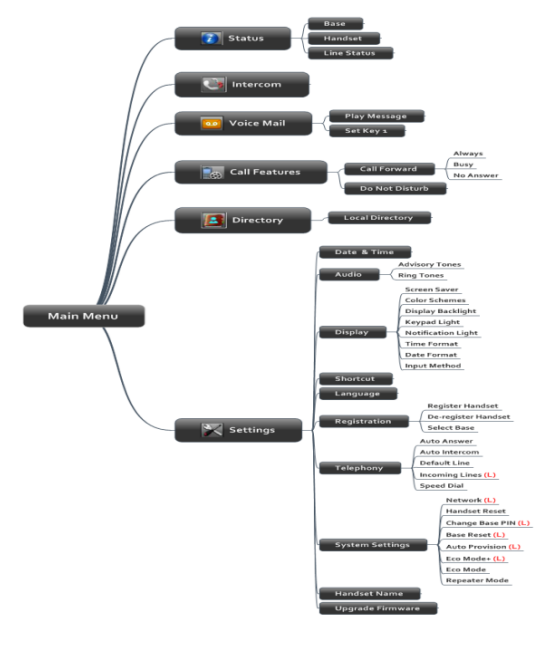
Status
You can view the system status of the base station and the handset. Below is the available
information:
Base Station Status: Information about the IP Address, Mac address, Firmware
version and network settings will be included
Handset Status: Information for the hardware version, model, IPUI code and firmware version of the handset can be found
Line Status: You can check the status of the line
Intercom
Using this feature you can make internal calls to the other handsets that are registered under the same base station.
Voice Mail
Play Message: You can access your voice mail system
Set Voice Mail: It is not recommended to make any changes on the voice mail
settings
Set Key 1: By default if you press the key 1 you will call to the voice mail
Call Features
Call Forwarding: There are 3 call forwarding types
Always Forward: Incoming calls are immediately forwarded.
Busy Forward: Incoming calls are immediately forwarded if the line is busy.
No Answer Forward: Incoming calls are forwarded if not answered after a period of
time.
Do not Disturb: If the DND is enabled all the incoming calls will be rejected
Directory
You can configure up to 500 local contacts. All the contacts will be saved on the base station.
Currently only the local directory is available. Note: LDAP-Corporate directory search is not available on this particular device.
Phone Settings
Only the settings that can be changed will be described. The locked settings are not be included.
Advisory Tones
Advisory tones are acoustic signals of your handset, which inform you of different actions and states. The following advisory tones can be configured independently of each other:
Keypad Tone: plays when a user presses any key of the keypad.
Confirmation: plays when a user saves settings or places the handset in the charger cradle.
Low Battery: plays when the capacity of the batteries is low and the handset requires charging.
Ring Tones
Ring tones are used to indicate incoming calls. You can set 9 different ring tones to distinguish the incoming line on your handset. You can also set a ring tone for an incoming intercom call. When receiving an incoming call, the handset rings the specified ring tone.
Also you can set the ringtone volume.
Screen Saver
The screen saver of the handset is designed to protect your LCD screen by filling it with an analogue
clock. You can enable the screen saver to protect the LCD screen if you do not use your handset for a long time. When the screen saver is enabled, an analogue clock will be activated and appear on the LCD screen if the handset is idle for approximately 10 seconds.
Colour Schemes
You can change the background of your handset by changing the colour theme. There are 2 colour themes available.
Display Backlight
Handset backlight status in the charging state or out of the charging state can be configured independently of each other. If enabled, the backlight is always on. Otherwise, the backlight is turned off after the handset is idle for a period of time. But the backlight is automatically turned on when an incoming call arrives, a key is pressed or the status of handset changes. You can disable the backlight to save power.
Keypad Light
You can enable the keypad light to make the keypad light up when any key is pressed. This helps you distinguish keys from each other in a dark environment.
Notification Light
Notification light is used to indicate voice mails and missed calls. When the handset receives a voice mail or misses a call, the message key LED flashes red. You can configure the notification light to indicate the voice mails or missed calls respectively.
Time Format
You can configure the time format of your device. The handset supports two time formats (12 Hour or 24 Hour).
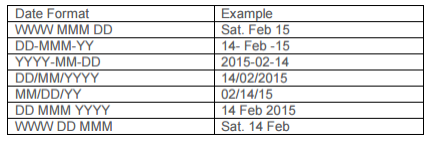
Date Format
You can configure the date format of your device. The handset supports seven date formats. The available date formats are listed in the following table:
Input Method
The handset provides you with 12 different input methods. You can disable the infrequently used input method. Then you can only switch among the enabled input methods when editing.
Shortcuts
There are two types of shortcut on the handset: changeable and unchangeable shortcuts. A feature is preassigned to each shortcut. For example, the star (*) button to turn on/off the silent mode and the hash (#) button to lock/unlock the keypad are unchangeable.
The changeable shortcuts are the two soft keys and four navigation keys. The available features that can be assigned to each key may vary.
You can assign the frequently used features to the changeable shortcuts of your handset.
This helps you get quick access to a feature by pressing the corresponding shortcut directly without having to scroll through the menu when the handset is idle.
Language
Even if the language of the handset is not locked, the language has been defined on the configuration file and is set to “English” by default. That means even if the end user makes any changes to the language, once the device restart it will have the English language.
Auto Answer
When auto answer feature is enabled, you can simply answer the incoming calls by picking up the handset from the charger cradle without having to press the off-hook key. The auto answer feature works only if the handset is placed in the charger cradle.
Auto Intercom
The handset can automatically answer an incoming external intercom call and play warning tone only when there is only one handset subscribed and no call in progress on the handset.
To automatically answer an incoming internal intercom call, you need to enable auto intercom feature on the handset. The following configuration types of auto intercom feature are available for
selection:
On (Beep On): Auto intercom feature is on. The handset will answer an incoming
internal intercom call automatically and play a warning tone.
On (Beep Off): Auto intercom feature is on. The handset will answer an incoming
internal intercom call automatically without a warning tone.
Off: Auto intercom feature is off. You need to answer an incoming internal intercom
call by pressing the Accept soft key.
Speed Dial
Speed dial allows you to perform single-digit dialling to predefined numbers. You can assign the important numbers of your local directory to the speed dial keys of your handset.
Handset Reset
You can reset individual settings that you have made on the handset. Resetting handset will not overwrite settings of directory, call history, voice mail and the handset registration to the base station.
Eco Mode
Eco mode greatly reduces the transmission power and signal output when the phone is in the talk mode. The attenuation range is 20m. When the distance between the base station and the handset
is over 20m, the eco mode is disabled automatically.
Repeater Mode
Repeater mode extends the radio coverage of the base station. The repeater has the same radio coverage as the base station. This feature is especially useful for users who require mobility in large
areas. If the repeater mode is enabled, and a repeater is registered to the base station, the handset registered to the base station can be used either in the base station or the repeater coverage area,
thereby providing users with greater freedom in mobility. Later on we will explain how to use the repeater with the base station.
Handset Name
The handset will be assigned a name by default if successfully registered to the base station (i.e. H1, H2 etc). You can personalize the handset name.
Supported Call Features
Hold/Resume
You can place an active call on hold. At any time, at most one active call can be in progress on your handset. You can answer or make another call while placing the original call on hold.
To put a call on Hold press Options soft key and then select Hold.
To resume the call press the Resume soft key.
If 2 calls are on hold at the same time you can use the Up/Down arrow or the Swap soft key to swap between the two calls.
Call Mute
While you are on a call you can mute your microphone so the other party will not be able to hear
you.
To mute your microphone press the  key. To un-mute the microphone press again the same key.
Redial a call
The redial number list stores the twenty last dialled phone numbers. When the memory of the redial number list is full, the handset will automatically erase the oldest dialled number when a new
number is dialled.
To go to the redial list press the  key.
key.
Transfer a call
There are 3 different types of call transfer:
Blind Transfer
To perform a blind transfer during a call, select the Options soft key and then press Transfer. Or you can press the key directly.
Enter the number or select the handset that you would like to transfer the call to, and then press
Transfer or the  key.
key.
Attended Transfer before Answer
To perform an attended transfer before the other party answers the phone, select the Options soft key and then press Transfer. Or you can press the key directly. Enter the number or select the
handset that you would like to transfer the call to, and then press the key to dial out.
Once you receive the ring back tone and before the other party answers the phone press Transfer
or the key.
Attended Transfer after answer
To perform an attended transfer before the other party answers the phone, select the Options soft key and then press Transfer. Or you can press the key directly.
Enter the number or select the handset that you would like to transfer the call to, and then press
the key to dial out. After the other party answers the phone press Transfer or the key.
Conference Call
In order to initiate a conference call, follow the steps below:
Place a call to User A
Press the Options soft key and then select Conference
Enter the number of the User B that you would like to add to the conference, and then
press the oror or the “OK” soft key to dial out.
When User B answers the call press the Conf. soft key to join all the parties into the
conference bridge.
To add another User into the conference bridge follow the steps above. Up to 4
parties (including yourself) can be in the conference call.
To end the conference call, press the  key.
key.
Call Forwarding
There are 3 types of call forwarding that can be managed by the device:
Call Forward Always:
Incoming calls are immediately forwarded to the specified number
Call Forward Busy:
Incoming calls are forwarded to the specified number when the line is busy
Call Forward No Answer:
Incoming calls are forwarded to the specified number if the call is not answered after a period of
time. Below are the steps in order to enable one of the call forwarding options:
Go to the Main Menu
Press Call Features ( ) and then Call Forward
Select the Call Forwarding type that you want
Provide the relevant information (i.e Number, time) then press save.
Do Not Disturb
When the DND is activated, all the incoming calls will be rejected automatically. Below are the steps
to enable or disable the DND:
Go to the Main Menu
Press Call Features ( ) and then Do Not Disturb
Enable or Disable the feature
Press OK
Voice Mail
When you are receiving a voice mail, the icon  is appearing on the screen with the number of unread voice mails. Also the message key flashes red.
There are 3 different ways to access your voice mail:
Press the message key, and then Select the voice mail
Press and hold the digit key 1
Press to go to the main menu, then select Voice Mail and then select Play
Message
•
When you are receiving a voice mail, the icon is appearing on the screen with the number of unread voice mails. Also the message key flashes red.
There are 3 different ways to access your voice mail:
Press the message key, and then Select the voice mail
Press and hold the digit key 1
Press to go to the main menu, then select Voice Mail and then select Play
Message
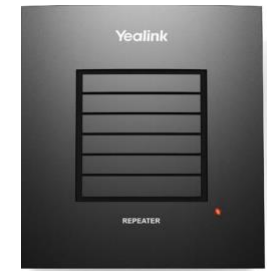
DECT Repeater (RT10)
The Yealink Repeater (RT10) can be deployed to extend the range of the W52P IP DECT phone to cover areas where reception was previously not available. All the usual handset functions are
supported by the base station in the extended radio range. The repeater, base station and cordless handset employ wireless connection. In this section we will describe the process to register/deregister a repeater to a base station and also some tips will be provided on how to deploy a repeater
Useful information
Repeater has the same radio coverage (up to 300m in unobstructed outdoor areas and up to 50m inside buildings) as the base station. Repeater does not increase the quantity of call paths. It shares the call paths with the base station. Adding a repeater is similar to adding a base station on the
multi-cell system.
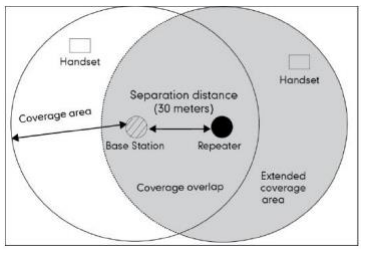
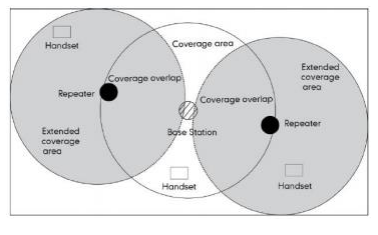
Single Repeater
In this case an extended coverage range (30m) is required. You can install a repeater within the base station coverage area. The separation distance between the base station and repeater is 30m.
The base will hand over calls to the repeaters as the user moves from the base station coverage area into the extended coverage area. If you want to extend the coverage range, you can extend
the separation distance between the base station and repeater.
Multiple Repeaters
Up to 6 repeaters can be registered to one base station to extend available reception range for all registered handsets. All repeaters must be installed within the base station coverage area (up to
300m in unobstructed outdoor areas and up to 50m inside buildings), as shown in the figure below.
It is not possible to install the repeaters in series or “daisy-chain”.
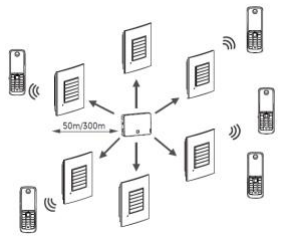
The maximum number of handsets that can be registered to your base station is not affected by the repeater. The repeater can be used to extend the coverage range in all directions, allowing several
floors to be covered.
If the repeater is placed correctly (overlapping the coverage area of the base station), the handsets can move freely within the total coverage area while on a call.
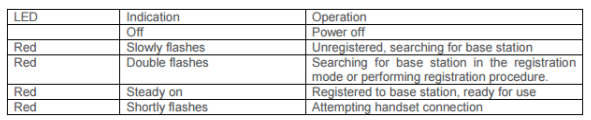
LED Status
The DECT repeater has one LED indicator describing the repeater operations. The following table provides instructions on repeater operations and LED indications:
Registering a repeater
The repeater can register to the base station in two ways:
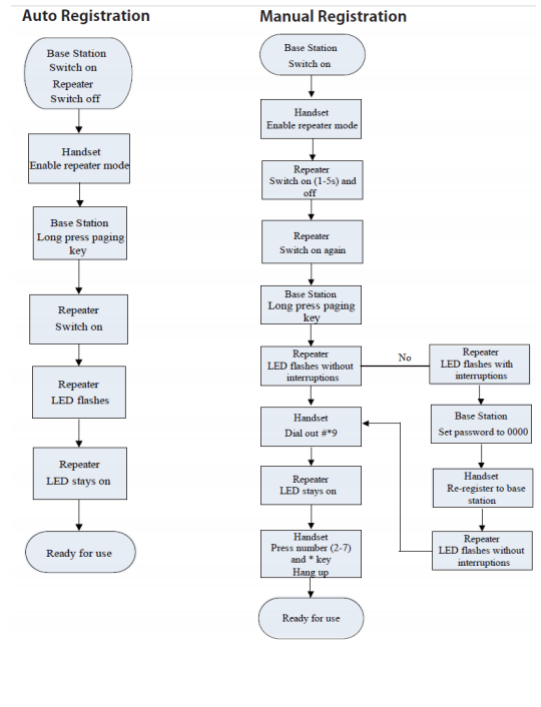
Auto Registration
Manual Registration
Note: The “Repeater Mode” must be enabled on the base station. In order to do that, go to Main
Menu> Settings> System Settings >Repeater Mode> Change
Auto Registration
To register a repeater automatically:
Switch on the repeater and check if the LED indicator on the repeater double flashes.
If the LED indicator does not double flash, you need to de-register the repeater first.
Please refer to “Deregistration”. If the LED indicator double flashes, go to next step.
Switch off the repeater (disconnect the power adapter).
Set the base station in registration mode. Long press the paging key on the base
station till the first LED flashes.
Switch on the repeater (connect the power adapter).
The LED indicator on the repeater flashes. After a short while, the LED indicator stays
on permanently indicating that registration is completed, and the repeater is ready for use. The first LED on the base station flashes after the registration is completed. You can press the paging key to cancel the flash.
Note: If the registration is not successful, the LED indicator will flash continuously. In this case,
repeat steps from Switch off Repeater.
Auto Registration
To register a repeater automatically:
Switch on the repeater and check if the LED indicator on the repeater double flashes.
If the LED indicator does not double flash, you need to de-register the repeater first.
Please refer to “Deregistration”. If the LED indicator double flashes, go to next step.
Switch off the repeater (disconnect the power adapter).
Set the base station in registration mode. Long press the paging key on the base
station till the first LED flashes.
Switch on the repeater (connect the power adapter).
The LED indicator on the repeater flashes. After a short while, the LED indicator stays on permanently indicating that registration is completed, and the repeater is ready for use. The first LED on the base station flashes after the registration is completed. You
can press the paging key to cancel the flash.
Note: If the registration is not successful, the LED indicator will flash continuously. In this case,
repeat steps from Switch off Repeater.
Below is the flowing diagram of the Auto and Manual Registrations:
Placement
To achieve optimum performance for the repeater, it is important to find a good location. Below are
some tips:
- Choose a raised position for both the base station and repeater wherever possible.
- When positioning the repeater, avoid obstacles that can interfere with radio transmission such as thick wall and metal structures that may be in the coverage area between the base station and repeater.
- Avoid interference from other electrical appliances such as micro-wave ovens, Hi-Fi
equipment, computers etc.
- Keep a minimum of 10 meters between multiple repeaters to avoid coverage areas
overlapping.
- Do not hide base station/repeater behind furniture etc.
- The base station/repeater must be placed where the signal is needed
Note: The LED indicator remains on constantly after the repeater has been switched on. If the LED
flashes, the repeater is too far away from the base station or reception is hindered by obstacles.
Verification Tone
To find the best possible location for the repeater, you may need to try various locations. Place a
call and walk around with the handset to determine the base station’s coverage area. The verification tone allows you to easily check the extent of the repeater’s coverage area. The tone is audible on the handset during a call.
To activate the verification tone on the repeater:
- Switch off the repeater (disconnect the power adapter).
- Switch it on for 1 to 5 seconds and switch it off again.
- Switch it on again. The LED indicator on the repeater flashes slowly.
- Switch it off again.
- Switch it on again.
The verification tone is then activated.
Place a call using the handset to check whether the handset is working in the extended area of the
repeater. If the call is successfully handled by the repeater, you can hear the verification tone from
the handset every few seconds.
To deactivate the verification tone, repeat the above steps.
De-Registration
If you want to register the repeater to another base station using the auto registration method, deregister the repeater beforehand as described below:
Switch off the repeater (disconnect the power adapter).
Switch it on for 1 to 5 seconds and switch it off again.
Switch it on for 25 to 35 seconds and switch it off again.
After a while, the LED indicator on the repeater double flashes, and the repeater is ready for a new
auto registration
END