
This user guide provides you with all the information you need to get the most from your phone. You must first set up your phone before you can use it. This doesn’t take long as it is easy to do.
Got everything?
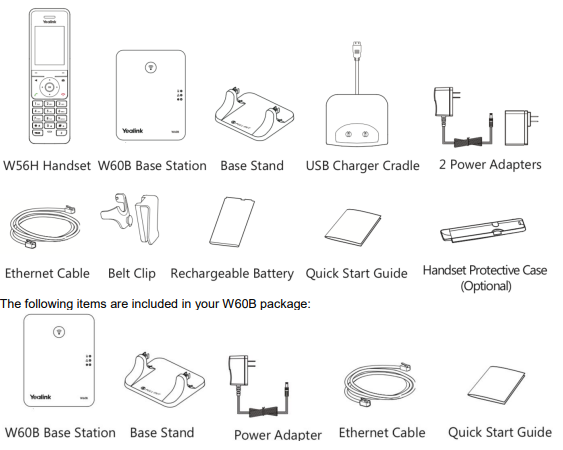
The following items are included in your W60P
package:
Handset
Base Station
Base Stand
USB Charger Cradle
Two Power Adapters
Belt Clip
Ethernet Cable
Rechargeable Battery
Quick Start Guide
The following items are included in your W60B
package:
Base Station
Base Stand
Ethernet Cable
Power Adapters
Quick Start Guide
The following items are included in your W56H
package:
Handset
USB Charger Cradle
Power Adapters
Belt Clip
Rechargeable Battery
The following items are included in your W60P package:

Phone Installation
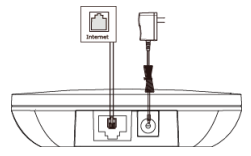
1. Connect the network and power for the base station in one of the following ways, as shown below:
a. AC Power Option
Connect the DC plug on the power adapter to the DC5V port on the base station and connect the other end of the power adapter into an electrical power outlet.
Connect the included or a standard Ethernet cable between the Internet port on the base station and the Internet port in your network or the switch/hub device port.
b. PoE (Power over Ethernet) Option
Using a regular Ethernet cable, the base station can be powered from a PoE-compliant (IEEE 802.3af) switch or hub.
Connect the Ethernet cable between the Internet port on the base station and an available port on the in-line power switch/hub.
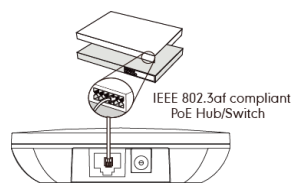
Noted: If in-line power is provided, you don’t need to connect the AC adapter. Make sure the switch/hub is PoE compliant. Important! Do not remove the power and network to the base station while it is updating firmware and configurations.
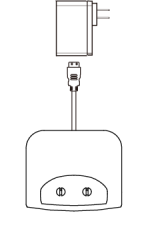
2. Connect the charger cradle, as shown below:
Connect the DC plug on the power adapter to the DC5V port on the charger cradle.
Connect the other end of the power adapter into an electrical power outlet.
3. Charge the handset, as shown below:
After setting up the handset and charger cradle, place the handset in the charger cradle.
The original handset included in the W60P package is pre-registered to the base station. After charging, the handset is ready for use.

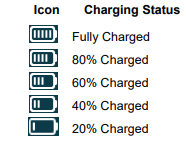
4. Battery Charging Status
The handset battery takes about 3 hours to fully charge. Charging status of battery is displayed on the top right-hand corner of the LCD screen:
Provisioning
Your Yealink W60P DECT Phone will be pre-loaded with all the information it needs to automatically provision the HVS service once all the connections have been made.
1. Once connected to the network port that is providing network access the phone will do a series of firmware updates (please allow the phone time to complete).
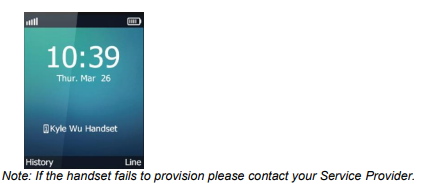
2. Once complete the phone will now show the line number against a line key.
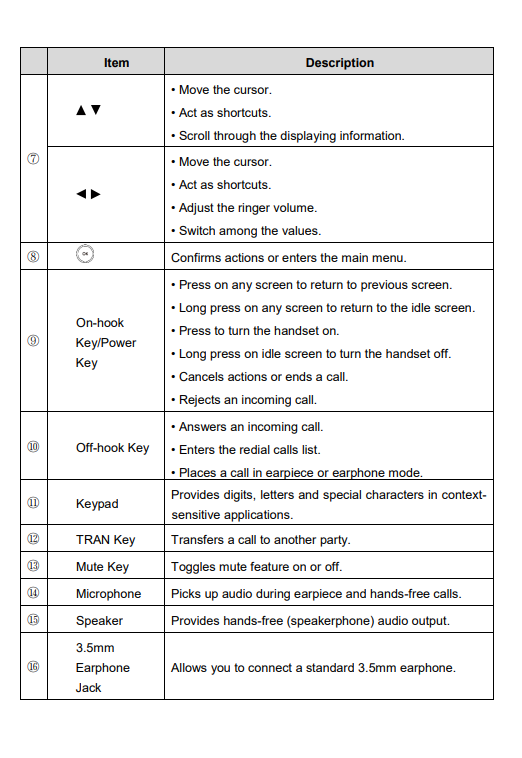
Getting to know your phone
Hardware Component Instructions
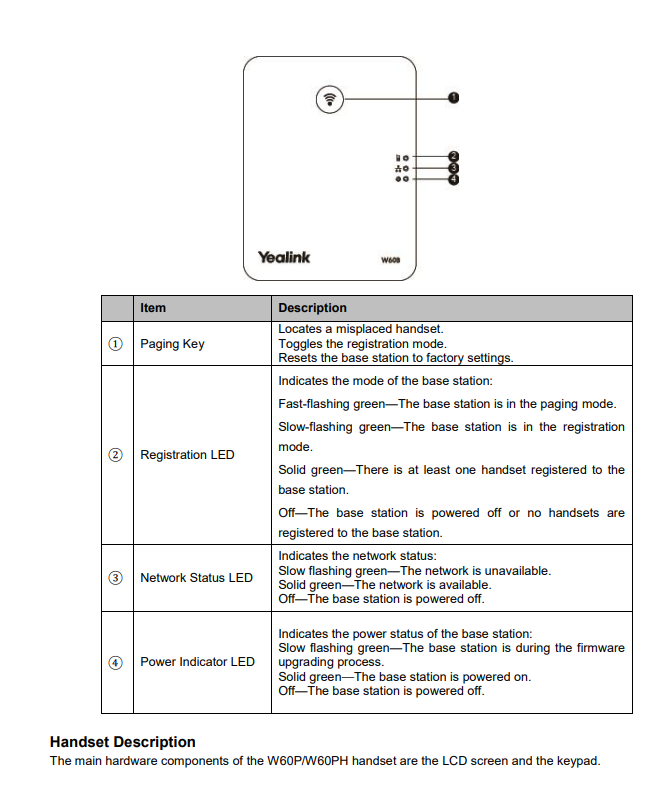
Base Station Description
After the base station starts up successfully and the handset is registered to the base station, all LEDs on the base station illuminate green in sequence.
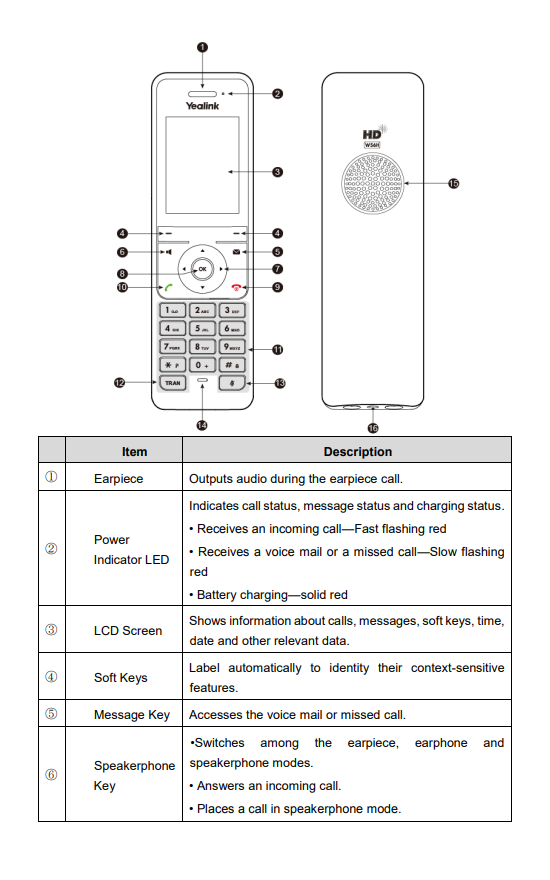
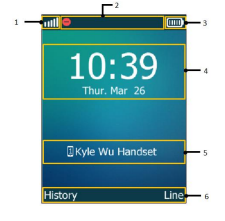
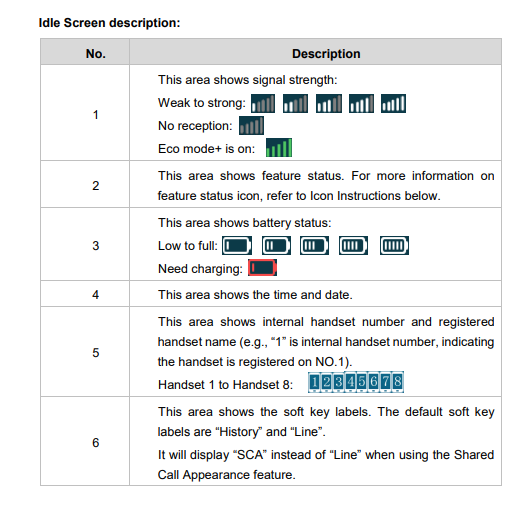
Phone Display (Views)
Displaying Information on LCD Screen
The idle screen may be shown as below:
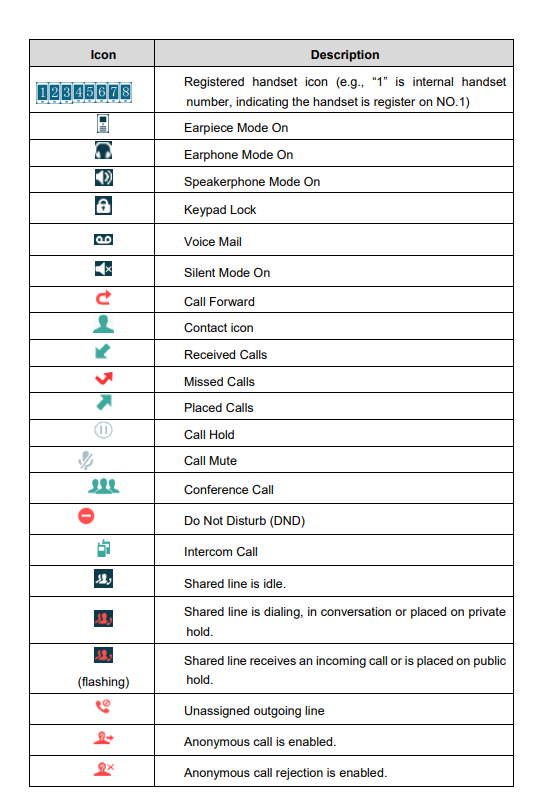
Icon Instructions
Checking System Status
You can view the system status on your handset. Available information of the system status includes:
Base station status (IPv4 status or IPv6 status, firmware version, MAC address, device certificate status, RFPI and network information)
Handset status (model, hardware version, firmware version, IPUI code, SN code and area)
Line status
To check the base station status via the handset:
1. Press to enter the main menu.
2. Select Status->Base.
The LCD screen displays status information of the base station and the Network option.
3. Press  or
or  to scroll through and view the status information.
4. Select Network, and then press the Enter soft key.
The LCD screen displays the connected network information.
To check the handset status via the handset:
1. Press to enter the main menu.
2. Select Status->Handset.
The LCD screen displays the status information of the handset.
3. Press or to scroll through the status information.
To check the line status via the handset:
Do one of the following:
- Press the Line soft key when the handset is idle to check the line status directly.
- Press to enter the main menu.
Select Status->Line Status
The LCD screen displays all lines registered to the currently used base station with icons for indicating the line status. For example, the icon at the bottom of a line indicates that you cannot place a call using this line on the handset.
Handset Registration
You can register up to 8 handsets to one W60P base station. Each handset can be registered to 4 different base stations.
To register a new handset manually:
When the handset LCD screen prompts “Press base paging 2s then press Reg.”, long press  on the base station till the registration LED flashes. There are two methods to register a new handset:
Easy Registration:
1. Press the Reg soft key on the handset to register quickly.
Normal Registration:
1. Press the OK soft key on the handset, and then select Register Handset.
2. Select the desired base and then press the OK soft key. The handset begins searching the base.
3. Press the OK soft key after searching a base successfully.
4. Enter the base PIN (default: 0000), and then press the Done soft key to complete registration.
After the success of registration, the handset LCD screen prompts “Handset Subscribed” and “Base NO. (The Last 4 characters of connected Base’s MAC address)”.
After initializing data successfully, an icon with internal handset number and handset name appears on the LCD screen.
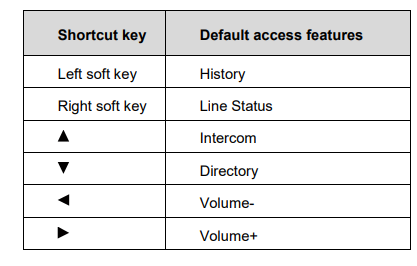
Shortcuts
This helps you get quick access to features by pressing the shortcut keys directly without having to scroll through the menu. You can press the following predefined shortcuts to access some frequently used features of your handset when the handset is idle:
end