
Getting Started
The W73P is a single cell DECT device from Yealink. The W73P has two components, the W70B base station and the W73H handset. You can purchase additional W73H handsets separately, though one comes in the W73P package.
The W73P will allow you to register up to 10 users using the W73H handset per W70B base station. When using a RT30 Repeater, it also supports "Cascade mode" as well as "Star Mode". For full details on these modes, please see the Yealink DECT Repeater RT30 guide.
Before you use your phone, you should take some time to get familiar with its features and user interface
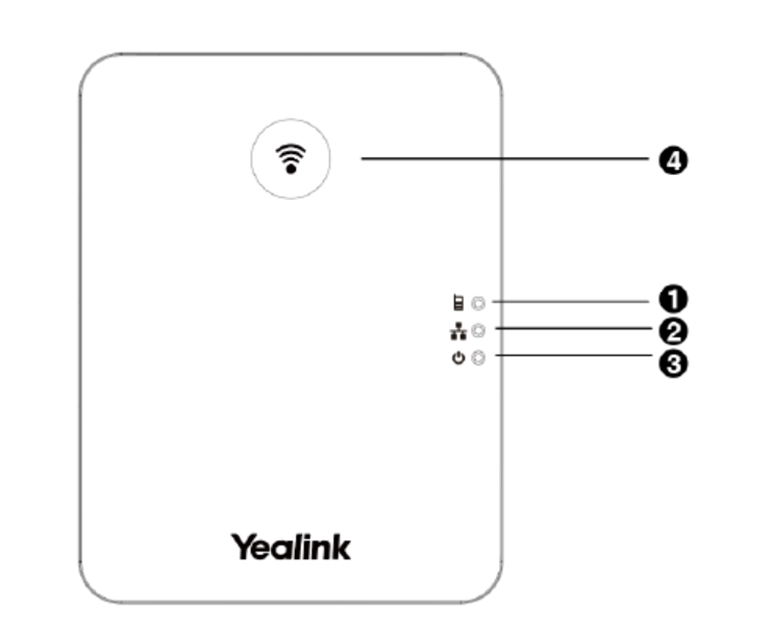
W70B Base Station

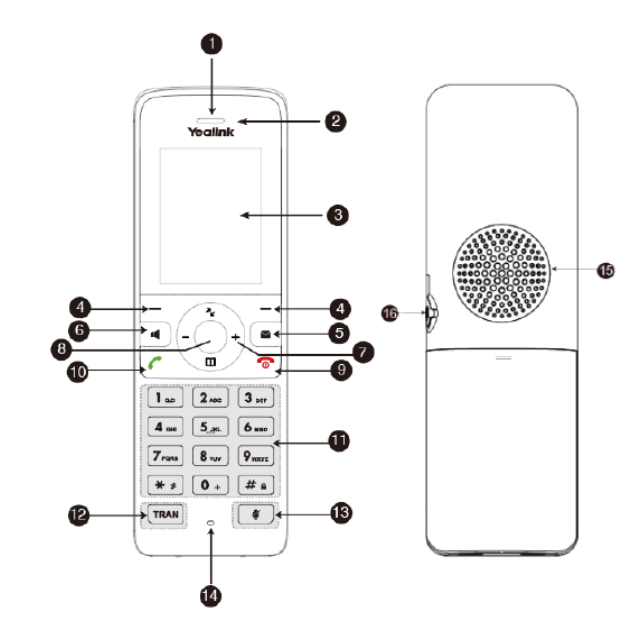
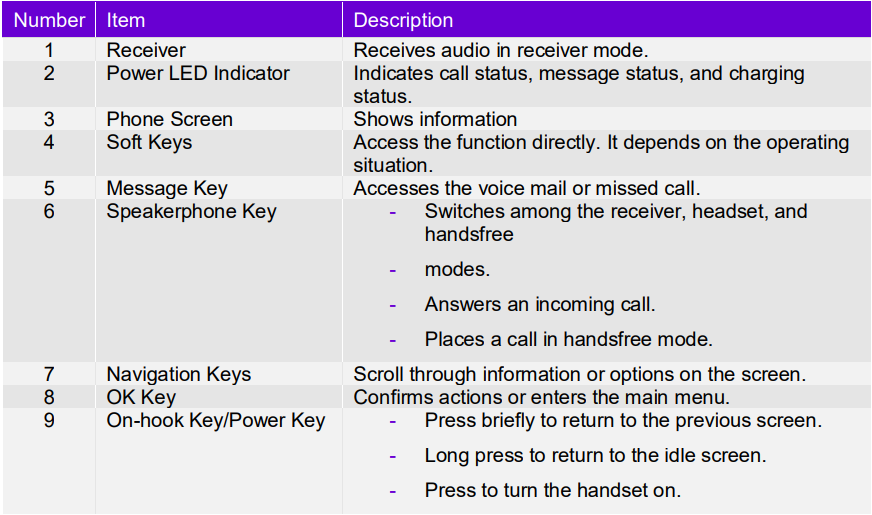
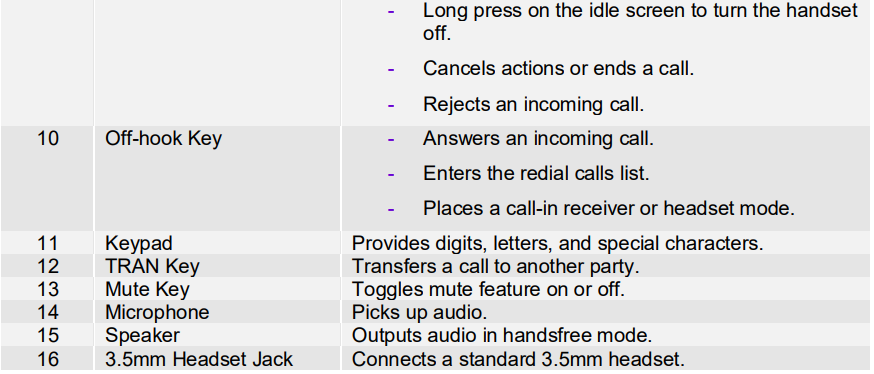
W73H Handset
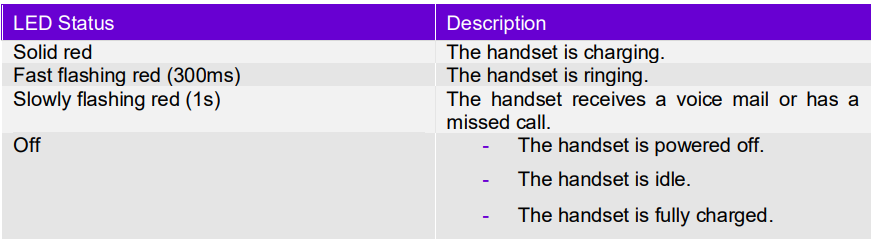
Power LED Indicator
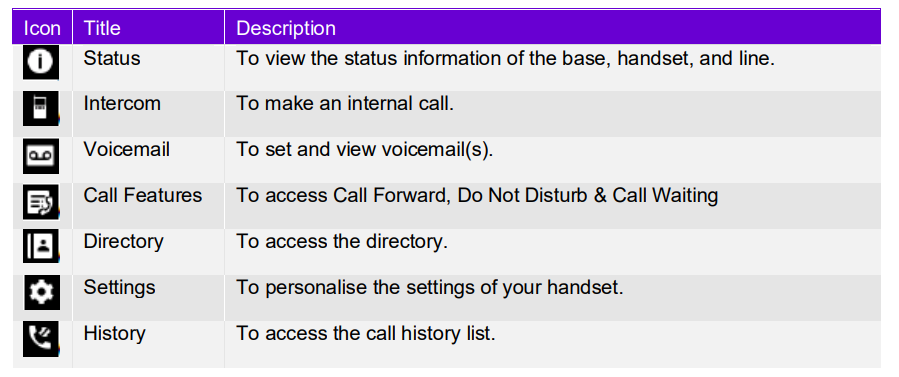
Menu Options
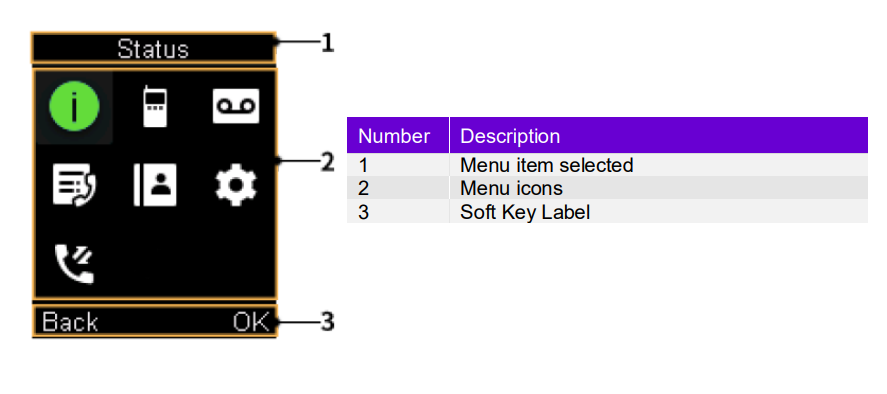
To access the main menu, simply press the OK button on the handset when the handset is idle. To return to the main screen you can long press the On-hook key to quickly exit the menu.
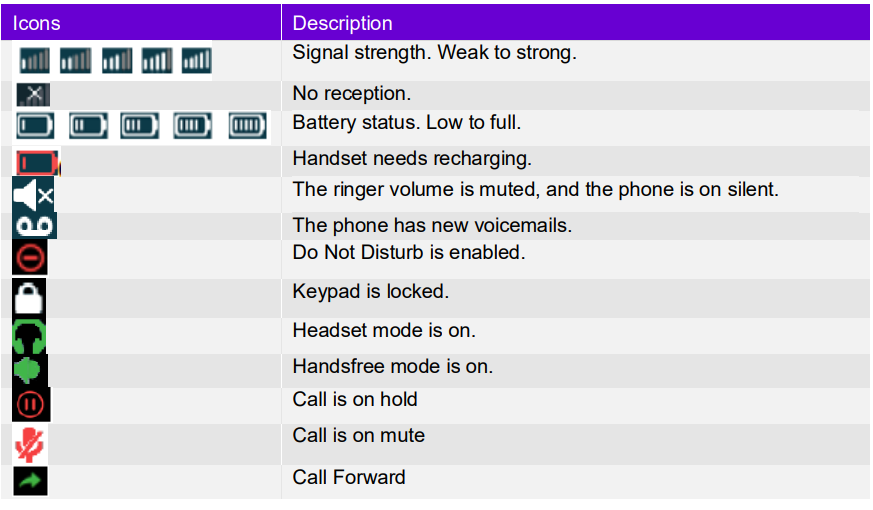
Icons
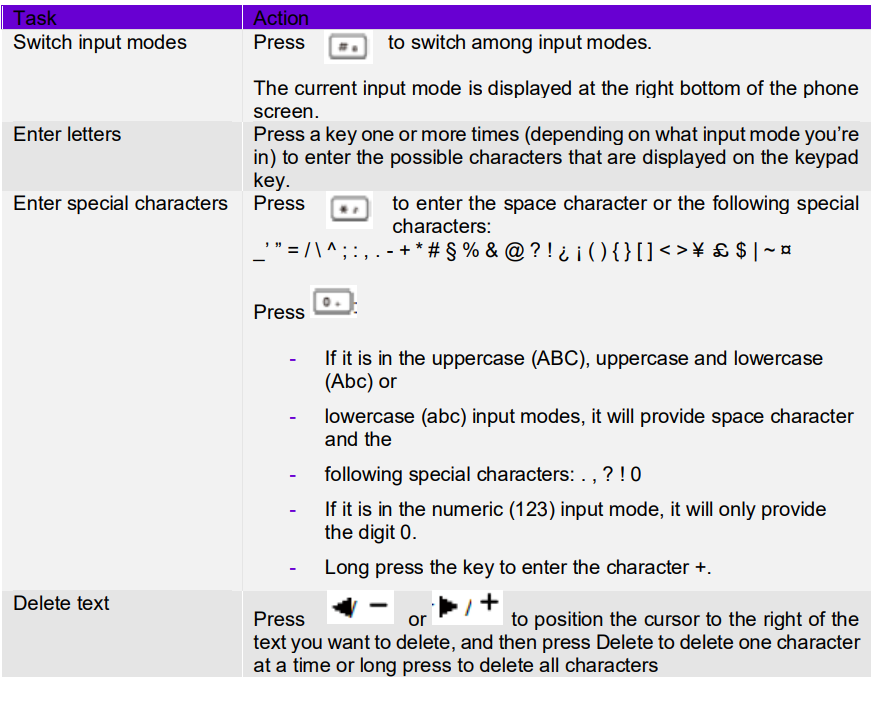
Entering data on the W73H
Register the Handset(s) to Base Station
You need to register your handset to a base station if you want to use the basic functions of the DECT phone. You can register up to 10 handsets per base station.
Putting the Base Station into Registration Mode
Before registering the handset, you must put the base station into registration mode. To do this, long press the registration button (pictured right) on the base station until the registration LED flashes.
If the base station does not identify a DECT handset within 90 seconds the registration mode will switch off.
Registering a W73H handset to the Base Station
Once the base station is in registration mode, you can register your handset to the base station. To do this, press the Reg soft key to register the handset.
The handset is now searching for a base station in registration mode.
After the handset is registered successfully, the phone prompts “Handset Subscribed” and “Base number [The last 4 characters of the connected Base’s MAC address]”.
After the handset initialised successfully, an icon with the internal handset number and handset name appears on the phone screen.
Registering a W73H to another Base Station
If you wish to change which base station the W73H is registered, then complete the following steps.
Make sure the base station is in the registration mode then:
- Go to OK > Settings > Registration > Register Handset.
- Select the desired base and then press OK. The handset begins searching for the base station
which is in registration mode.
- Press OK after a base is found
- Enter the base PIN (default is 0000) and then press Done to complete the registration.
After the handset is registered successfully, the phone prompts “Handset Subscribed” and “Base number [The last 4 characters of the connected Base’s MAC address]”.
After the handset initialized successfully, an icon with the internal handset number and handset name appears on the phone screen
Troubleshooting
The W73H handset will alert you if registration has not been completed. Common reasons why registration fails include:
1. Incorrect base PIN has been entered
2. Base station is out of range
3. Base station is not in registration mode
Deregistering a handset
- Go to OK > Settings > Registration > De-reg. Handset.
- Enter the base PIN (default: 0000), and then press Done or OK. The handset screen displays the handsets names that are registered to the same base station. The name of the handset itself is highlighted and followed by a left arrow.
- Select the desired handset, and then press OK. The handset screen prompts you whether to deregister the handset.
- Confirm the action
Placing a call
After the handset is registered to the base station, you can use your handset to place an internal or external call.
The handset can handle 2 calls at the same time.
Placing an internal call (Intercom)
Intercom is a useful feature in the office to quickly contact a colleague. Intercom calls are made between handsets registered to the same base station.
The following types of auto intercom feature are available:
- On (Beep On): The handset answers an intercom call automatically and plays a warning
tone.
- On (Beep Off): The handset answers an intercom call automatically without a warning tone.
- Off: Auto intercom feature is off. You need to answer an intercom call manually.
To select which auto intercom you wish to use, go to OK > Settings > Telephony > Auto Intercom and select the desired option.
To place the call, go to OK > Intercom and select the desired handset or All Handsets and select OK or the Off-hook key. Selecting All Handsets will ring all other registered handsets to that bae station simultaneously
Placing an Internal Call during an External Call
During an external call, you can place a call to an internal line. To do this, complete the following steps:
1. Select Options > Intercom
2. Select the Desired Handset and press OK or Send
Placing External Calls
To make a telephone call, simply enter the extension number or telephone number of your destination and press OK or Off-hook key.
Placing multiple External Calls
When you are in an active call you can put your call on hold and then place a new call.
1. Select New Call
2. Enter the extension number or telephone number and then press the OK key
Placing a Call from the Call History
You can place calls to contacts from the History list, which contains the calls that were recently placed, answered, or missed.
1. Press History or go to OK > History
2. Select the desired call list
3. Highlight a contact and press the Off-hook key or Send.
Placing a Call from the Directory
You can place a call to a contact directly from your directory.
1. Press OK > Directory
2. Select the desired directory
3. Highlight a contact and press the Off-hook key or Send.
Redial
You can redial a call from the Redial list. The W73H stores the last 20 dialled phone numbers. When the redial list gets full, the handset will automatically erase the oldest entry when a new number is dialled.
Answering Calls
When you receive an incoming call, the phone will ring and the screen will display the information of the incoming call. You can press the Answer button to accept the call.
Answering a call when you're already in a call
You can answer a call when there is already an active call on your phone and you have Call Waiting enabled on the Horizon platform.
When you are in an active call and an incoming call arrives on the phone, a call waiting tone beeps, and the incoming call information is displayed.
To answer the call, press the down navigation key to select the incoming call and select Answer.
Silencing an incoming call
You can silence a call to stop your phone from ringing. Even if you silence the call, the incoming call notification continues to be displayed on your phone. To do this, simply press Silence on the device when it is ringing.
Rejecting a call manually
You can reject a call manually and the call will then follow the call busy treatment that has been set up in the Horizon portal. To reject the call, simply press Reject or the End Call button when the phone is ringing.
Rejecting calls with Do Not Disturb (DND)
You can enable DND to reject all incoming calls automatically when you do not want to be interrupted.
1. Go to OK > Call Features > Do Not Disturb
2. Select the directed line and press OK
3. Enable DND and confirm the action. The status bar will not display the DND icon.
In Call Actions
Muting / Unmuting Audio
You can mute the microphone during an active call so that the other party cannot hear your discussion with your colleagues.
Simply press the Mute key during a call to mute the microphone, and then press the Mute key again to unmute the handset.
Call Hold & Resuming a call
You can place an active call on hold and resume the call when you are ready. When you place a call on hold, the held party may hear the music set on the Horizon platform for the user.
When you are in an active call, simply press Options > Hold to place a call on hold, and then select Resume to resume the call.
Call Forwarding
You can set your call forwarding settings from the device and these will update the Horizon platform.
The types of call forwarding available are:
- Always Forward. Incoming calls are always forwarded. There is no prompt on the phone
screen when the line receives an incoming call.
- Busy Forward. Incoming calls are forwarded when the line is busy.
- No Answer Forward. Incoming calls are forwarded if not answered after a period.
1. Go to OK > Call Features > Call Forward.
2. Select the desired line.
3. Select the desired forwarding type and enable it.
4. Enter the destination number in the Target or Forward to field.
5. If you select the No Answer (No Answer Forward), select the desired ring time to wait before
forwarding from the After Ring Time field.
6. Confirm the action.
Transfer Calls
During a call, you can transfer the call to another contact. You can use one of three ways:
- Blind Transfer: Transfer a call directly to the third party without consulting.
- Attended Transfer (Consultative Transfer): Transfer a call with prior consulting.
Blind Transfer
1. Select Options > Transfer, or press the TRAN key during a call.
2. Enter the number you want to transfer the call to or select Directory > Directory/History to
choose a contact.
3. Press TRAN or Transfer to complete the transfer
Blind Transfer
1. Select Options > Transfer, or press the TRAN key during a call.
2. Enter the number you want to transfer the call to or select Directory > Directory/History to
choose a contact.
3. Press TRAN or Transfer to complete the transfer
Merging two calls into a conference
You can invite a held call into a conference call with the active call.
1. Place two calls on the phone.
2. Select Options > Conference.
Voicemail
1. Go to OK > Voice Mail > Play Message or press the Message key.
2. Select the desired line, and then press Select. The handset dials out the voice mail code using the selected line automatically.
Handset Settings
Screen Saver
The screen saver is designed to protect your phone screen. When the screen saver is enabled, an analogue clock will be activated and appear on the phone screen if the handset is idle for approximately 10 seconds.
1. Go to OK > Settings > Display > Screen Saver.
2. Press Change to select the Screen Saver check box (the default status is checked .
Changing the Brightness
When in charger/out of charger is enabled, the backlight will be turned off after the handset is idle for about 30 minutes when the handset is or is not in the charging cradle. When an incoming call arrives, a key is pressed or the handset status changes, the backlight is automatically turned on.
1. Go to OK > Settings > Display > Display Backlight.
2. Select the desired value from the Active Level field.
3. Select the desired value from the In Charger or Out Of Charger field.
4. Confirm the action.
Setting the Keypad light
You can enable the keypad light to illuminate the keypad keys when any key is pressed.
1. Go to OK > Settings > Display > Keypad LED.
2. Press Change to select the Keypad LED check box (the default status is checked).
Locking / Unlocking the handset
You can lock the device so that you can prevent accidental user of the handset. To do this, long press the # key whilst the handset is idle until the phone prompts you that the device is locked. To unlock
the handset, simply long press # again until the handset prompts you that it is unlocked.
Locating a handset
You can locate a misplaced registered using the base station by pressing the button on the base station.
Renaming the handset
The handset will be named automatically if successfully registered to the base station. You can
personalise the handset name.
1. Go to OK > Settings > Handset Name.
2. Edit the current name in the Rename/Phone Name field.
3. Confirm the action.
Silent Mode
You can enable the silent mode if you do not want to be disturbed. The handset will not ring when receiving an incoming call, but it will still display the incoming call information. Simply long press the * button until the phone displays "All Ring Tones Off". To turn silent mode off, simply long press the *
button again until the phone display "All Ring Tones On".
Repeater Mode
The Yealink RT30 DECT Repeater can be used with the W73P to extend the range of the DECT solution. All the usual handset functions are supported by the base station in the extended range.
The repeater, base station, and handset employee wireless connection. Repeater Mode is unavailable if the handset is set up in Eco Mode.
1. Go to OK > Settings > System Settings > Repeater Mode.
2. Select a desired repeater and press OK. The handset prompts whether to reboot this base station.
3. Confirm the action. The base station reboots to make the change take effect. The change is applied to all the handset registered to the base station.
Repeater has the same radio coverage (up to 300m in unobstructed outdoor areas and up to 50m inside buildings) as the base station. Repeater does not increase the quantity of call paths. It shares the call paths with the base station. The W73P will support "Cascade Mode", which allows "daisy
chaining" of up to 2 repeaters, as well as the standard "Star Mode" of up to 6 repeaters.
For full details on the RT30 repeater, please download the Yealink DECT Repeater RT30 guide.
END